PLAYHOUSE FOR THE KIDS
May 19, 2008
by: jovial_cynic
by: jovial_cynic
Using plans I found online, I decided that it was time for me to build a playhouse for my kids. I originally wanted to build a fort with a watch-tower and all the necessary accessories (including a gun turret), but since I had little experience building anything (working with wood scares me a bit), perhaps a playhouse is a better starting point.
The plans called for a 6'x8' deck floor, with a 4'x8' structure on top of it. That would leave a 2'x8' deck area in front of the house, which isn't too bad, but I figured that if I was going to go through the trouble of building a deck floor, I might as well make it large enough to have a wrap-around deck.
Furthermore, instead of a 4'x8' structure, I decided to go with a 6'x6'. It's only an extra 4 square feet, but with three little kids who will end up playing in the playhouse, those extra 4 feet are going to matter.

Building the floor actually took me a while. I realized after nailing down six deck boards that I was short about 13 boards. When I originally drew up the plans, I planned to use 2x8 boards, but I accidentally grabbed 2x6 boards from Home Depot instead. I also forgot to figure in that I increased the size of the deck to 8x8 intead of 8x6. Whoops. That required another trip.
Twenty-four boards later (at $2.75 each), this is the completed floor. In hindsight, I didn't have to make a deck floor. I could have thrown down a sheet of OSB over the frame and saved myself $50, but the deck floor is sturdier and will last longer. It also feels a little nicer to walk on it.
Having never framed anything before, I had a bit of anxiety about making the walls, fearing that I'd have to tear it down and build it back up. It turns out that it's actually quite easy.
Apparently, my fears were for nothing. Four straight walls later, it's starting to look like something.
Using plans I followed from buildeasy.com, I spent about an hour measuring and cutting the 2x4s for the roof. Miter saws are wonderful.
I got the front and rear rafters up on the playhouse tonight. As you can see from the picture, it's dark outside. Fortunately, my camera has little difficulty focusing in low light. Excellent.
My wife decided to take a picture of me nailing one of the rafters up. Note my trendy full-face shield. You never can be too safe when wielding a high-powered nail gun.
Here's the roof, the attached front gable , and the sheets. Fortunately, I only had to trim 1" off one of the plywood sheets; two sheets of 4x8 OSB fits nearly perfectly.
Fun fact: A roof isn't noticeably crooked until you put a right-angle sheet of OSB on it. To line it up, I had to pull at the roof with one hand and push the sheet back with my knee, while holding the nail gun and balancing myself on a ladder.
At least I was wearing my face shield.
Here, the walls are up, and holes cut are out for the windows.
I happened to have a package of shingles handy in my garage. There was a pretty severe wind-storm last winter, and I had to replace a few shingles on my roof. Handy.
I discovered, however, that a single package of shingles perfectly covers a 4'x8' area, and that by patching up those few spots on my house roof last year, I had just enough shingles to not finish a single side of the playhouse roof. Blast. I had to run to Home Depot again and buy TWO packages of shingles, as buying one would have left me with about 4 shingles too few.
Putting shingles on a roof at night probably isn't the best idea. Fortunately, my measurements were true, and the lines seem to be straight. I did cheat a bit -- I'm not using tar-paper as an underlayment. I'm not using anything at all; I just nailed the shingles straight to the roof. I think it'll turn out alright.
I only hit my thumb twice in the process of putting shingles on the roof in the dark. Also, instead of buying a pack of ridge shingles (the ones that go on the top), I cut some of the shingles that I bought to size and ran them down the ridge. I think it came out pretty well.
Man, what a difference those columns make. Not only do they provide the necessary support for the front part of the roof, they make the place look much more inviting. Those ancient Greeks sure knew what they were doing.

Rather than spend a bunch of money on actual siding, I decided to make lap siding for the playhouse. Even though it's in plywood, it looks very nice. It looks even nicer painted.
Here's more siding; we had to start caulking and painting right away, since plywood doesn't hold up to moisture very well. My wife decided on white and red, so I went to Home Depot and picked up the cheapest exterior paint I could find.

I also made some windows. The frames were made by cutting down some 2x4s with my table saw, cutting them at 45-degree angles at the joints, and carving out a channel for Plexiglas. They were a pain to make -- I don't recommend it. But it works, and after throwing some hinges on there, we've got some windows.
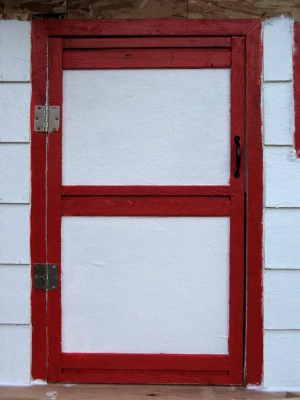
I made a door. I originally planned to do something really simple -- just framing up the door and throwing some plywood over it. In the middle of making the frame, I had a change of heart, and decided to use my table-saw to cut some channels into the 2x4s and 2x2s and mounted the plywood into the channels. I think it came out pretty well.

My wife, with the help of our 4-year old and 2.5-year old, painted the playhouse.

Each time we added something new, it added so much to the look of the playhouse. The fascia boards we added were a very nice touch.

With the last piece of siding done, the exterior is basically complete. All that's left is a bit more stain on the deck, a few more areas that need paint, and a solution for the gable; I haven't figured out what I'm going to do yet, but by the time I get the interior pictures up, I'm sure I'll have figured out something.
All in all, this project has cost about $550. Not too bad.
The plans called for a 6'x8' deck floor, with a 4'x8' structure on top of it. That would leave a 2'x8' deck area in front of the house, which isn't too bad, but I figured that if I was going to go through the trouble of building a deck floor, I might as well make it large enough to have a wrap-around deck.
Furthermore, instead of a 4'x8' structure, I decided to go with a 6'x6'. It's only an extra 4 square feet, but with three little kids who will end up playing in the playhouse, those extra 4 feet are going to matter.
Floor and walls
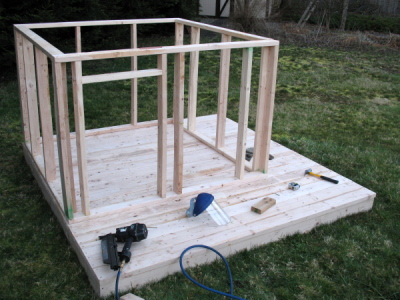
Building the floor actually took me a while. I realized after nailing down six deck boards that I was short about 13 boards. When I originally drew up the plans, I planned to use 2x8 boards, but I accidentally grabbed 2x6 boards from Home Depot instead. I also forgot to figure in that I increased the size of the deck to 8x8 intead of 8x6. Whoops. That required another trip.
Twenty-four boards later (at $2.75 each), this is the completed floor. In hindsight, I didn't have to make a deck floor. I could have thrown down a sheet of OSB over the frame and saved myself $50, but the deck floor is sturdier and will last longer. It also feels a little nicer to walk on it.
Having never framed anything before, I had a bit of anxiety about making the walls, fearing that I'd have to tear it down and build it back up. It turns out that it's actually quite easy.
Apparently, my fears were for nothing. Four straight walls later, it's starting to look like something.
The roof
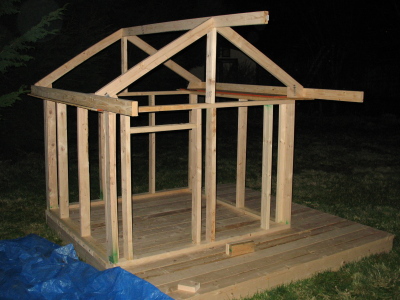
Using plans I followed from buildeasy.com, I spent about an hour measuring and cutting the 2x4s for the roof. Miter saws are wonderful.
I got the front and rear rafters up on the playhouse tonight. As you can see from the picture, it's dark outside. Fortunately, my camera has little difficulty focusing in low light. Excellent.
Sheeting the roof
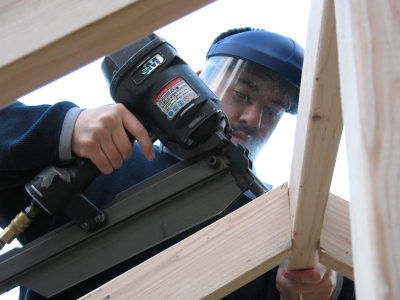
My wife decided to take a picture of me nailing one of the rafters up. Note my trendy full-face shield. You never can be too safe when wielding a high-powered nail gun.
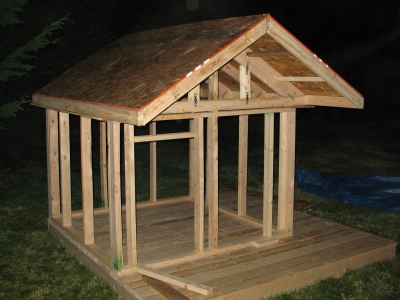
Here's the roof, the attached front gable , and the sheets. Fortunately, I only had to trim 1" off one of the plywood sheets; two sheets of 4x8 OSB fits nearly perfectly.
Fun fact: A roof isn't noticeably crooked until you put a right-angle sheet of OSB on it. To line it up, I had to pull at the roof with one hand and push the sheet back with my knee, while holding the nail gun and balancing myself on a ladder.
At least I was wearing my face shield.
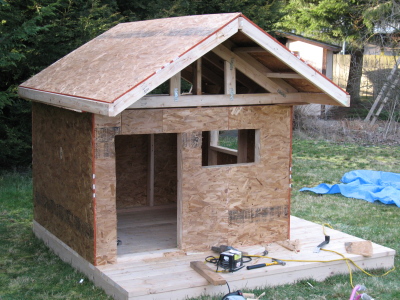
Walls
Here, the walls are up, and holes cut are out for the windows.
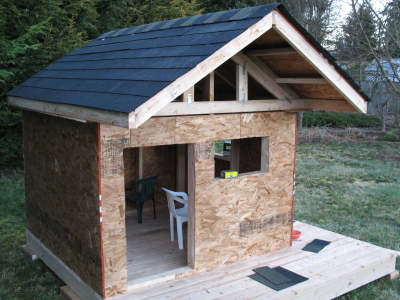
Completed roof
I happened to have a package of shingles handy in my garage. There was a pretty severe wind-storm last winter, and I had to replace a few shingles on my roof. Handy.
I discovered, however, that a single package of shingles perfectly covers a 4'x8' area, and that by patching up those few spots on my house roof last year, I had just enough shingles to not finish a single side of the playhouse roof. Blast. I had to run to Home Depot again and buy TWO packages of shingles, as buying one would have left me with about 4 shingles too few.
Putting shingles on a roof at night probably isn't the best idea. Fortunately, my measurements were true, and the lines seem to be straight. I did cheat a bit -- I'm not using tar-paper as an underlayment. I'm not using anything at all; I just nailed the shingles straight to the roof. I think it'll turn out alright.
I only hit my thumb twice in the process of putting shingles on the roof in the dark. Also, instead of buying a pack of ridge shingles (the ones that go on the top), I cut some of the shingles that I bought to size and ran them down the ridge. I think it came out pretty well.
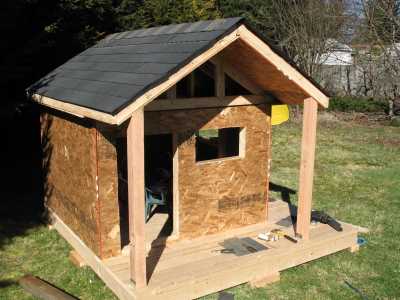
Columns
Man, what a difference those columns make. Not only do they provide the necessary support for the front part of the roof, they make the place look much more inviting. Those ancient Greeks sure knew what they were doing.
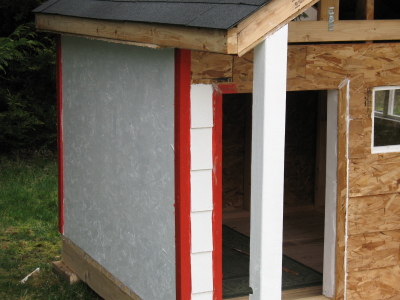
Lap siding
Rather than spend a bunch of money on actual siding, I decided to make lap siding for the playhouse. Even though it's in plywood, it looks very nice. It looks even nicer painted.
More siding, paint, and windows
Here's more siding; we had to start caulking and painting right away, since plywood doesn't hold up to moisture very well. My wife decided on white and red, so I went to Home Depot and picked up the cheapest exterior paint I could find.
I also made some windows. The frames were made by cutting down some 2x4s with my table saw, cutting them at 45-degree angles at the joints, and carving out a channel for Plexiglas. They were a pain to make -- I don't recommend it. But it works, and after throwing some hinges on there, we've got some windows.
Door and paint
I made a door. I originally planned to do something really simple -- just framing up the door and throwing some plywood over it. In the middle of making the frame, I had a change of heart, and decided to use my table-saw to cut some channels into the 2x4s and 2x2s and mounted the plywood into the channels. I think it came out pretty well.
My wife, with the help of our 4-year old and 2.5-year old, painted the playhouse.
Fascia boards
Each time we added something new, it added so much to the look of the playhouse. The fascia boards we added were a very nice touch.
Exterior nearly done
With the last piece of siding done, the exterior is basically complete. All that's left is a bit more stain on the deck, a few more areas that need paint, and a solution for the gable; I haven't figured out what I'm going to do yet, but by the time I get the interior pictures up, I'm sure I'll have figured out something.
All in all, this project has cost about $550. Not too bad.

