WATER HEATER ADVENTURE
March 11, 2008
by: jovial_cynic
by: jovial_cynic
Part 1:
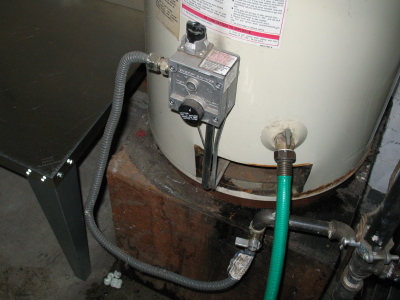
For a while now, I've noticed a bit of wetness on the base of my water heater. The base is wooden, and it's quite clear that there has been cases of periodic wetness in the past, as there are trails of moisture damage on it. Not knowing much about water heaters, I thought that condensation might have been the issue, similar to the way condensation builds up around toilets inside the house in the summer time.
After observing it for a while, I determined that there was, in fact a small leak -- right at the drain valve. I asked around, and everyone suggested that I run to Home Depot and grab a cap, since it was unlikely that I was going to need to access the water via the drain valve anyway. Following instructions, I capped it off and forgot about it for a few days.
The next time I looked over at the water heater, I discovered to my dismay that a small puddle had formed; the problem had gotten worse after sealing up the valve. It appears that the drain-valve may have been cracked closer to the water heater itself, and not at the valve. Solution: buy a new drain valve.
And while I was at it, I figured it was a good idea to replace the now soggy and rotting wooden base with a metal base.

Wet spot under the water heater.

Puddle forming at the bottom of the base.

Shiny new metal stand. Only $34. What a bargain. Why weren't these things made out of metal before? Who thinks that a wooden water-heater stand is a good idea?
The first step was to attach a garden hose to the drain and pop the valve open. Actually, no. The FIRST step is to turn off the gas. The second step is to close the water inlet valve, so you don't keep filling up the tank while you're trying to drain it... because you're just not going to win that race.
The draining process was agonizingly slow, as the valve is small... small like a beverage straw.
After it all drained, I tried to give the water heater a shake to see how difficult it would be to lift it, yank out the rotting base, and slide the metal one under it.
It didn't budge. Not one bit. I shook it violently (very violently), and still... nothing. I sat for a while trying to figure out what to do next, and figured that if I can't swap out the base, I might as well replace the drain valve with the new one I also picked up at Home Depot.
Now, the existing drain valve is plastic. After trying my hardest to turn it by hand, I went for the vice grips. It turns out that enough leverage with a pair of vice grips on a plastic drain valve that has no intentions of budging will cause the plastic drain valve to shatter. And it was after it shattered that the beverage-straw-sized hole increased in size... to a soda-bottle-neck-sized hole, and it was at that moment that I realized why the water heater was still so heavy. It was still full of water.
It turns out that draining a water heater creates negative pressure in the tank as long as all the hot-water valves in the house are closed. As the water drains, the internal air pressure decreases, and in the same way you can suspend soda in a beverage straw by sticking your tongue on the opening of the straw, you can prevent water from draining out of a water heater by keeping all of the hot water valves in the house shut.
However, when you break a drain valve and increase the diameter of the opening, air is able to enter the tank and displace the water, causing it to flow out. Hot. Unstoppable.

Here's me catching some of the water in a cup. And you can see how large the opening is.

And here's me alternating between cups and dumping the water into a bucket, so it doesn't flood my garage. I'm wearing a tee-shirt over my face, because all the water dumping onto the rotting wood base has unleashed a spore cloud from all the mold that'd been growing. Mold. Bleah. I later swapped out the tee-shirt with an actual gas mask that I keep handy. Don't ask.

Eventually, I got my hands on a funnel and was able to step away from the draining tank. Note that I've had time to get a gas mask, get a few cups, a bucket, a funnel... that's because this thing took nearly an hour to drain. AN HOUR. Bucket after bucket after bucket. Once I got the funnel set up, I spent much of the time sopping up water from the floor with a towel and wringing it out outside.

See that water? Does it look brown to you? Do you know why it looks brown? Because it's brown. Because this water heater is 20-years old, and over the course of 20 years, a water heater is bound to begin rusting on the inside. Absolutely disgusting.
Anyhow, at this moment, the water heater is *actually* drained out. I'm going to have to take some time off of work tomorrow morning so I can go out and buy a new water heater and get it installed on that new shiny metal base. Wish me luck.
More pictures coming tomorrow.
Oh, and if you want to see a video of the water heater slowly draining, here you go:
(Not for those with weak bladders)
Part 2
I took the next morning off of work to take care of the water heater. I ran to home depot to find a water heater that was close enough to the dimensions of my original one to reduce the amount of adjustments necessary to hook it all up. Unfortunately, Home Depot didn't carry a water heater with the exact dimensions. Fun.
Anyhow, I picked out another gas-powered 40-gallon water heater and brought it home, and removed the old water heater from the stand. I had to unscrew it from the inlet and output lines on top, unhook the gas line, and unhook the pressure release line.

Here's a shot of the rotting box. It's quite gross, and soft on top. I'm surprised it held up. I certainly wouldn't feel safe standing on it.

Here's the new heater sitting on top of the nice new stand. Hooray.

And here you can see that the new heater is several inches too short. The lines coming in and out of the heater were hard-lined; no flex-tube used. Lame. Knowing this was the case, I made sure to buy some flex tubes.

It looks like the pressure release outlet is also too short, so I had to cut the copper line and retube it.

The gas line to the heater is a female connector... and so is the gas inlet port. I scavenged the male/male adaptor from the old water heater and that worked out just fine.

The water inlet and outlet pipes were too long, so I cut them with a hacksaw and torqued on a compression fitting that came with the flex tubes.

Here's the compression fitting. No special adhesive required -- you just torque it on over the copper tubing.

Here's the top of the water heater all fitted up. The vent tubing flexed enough to fit properly, so I didn't have to modify it at all.

The last part was the pressure release line. I used the elbow and coupler fittings from the existing tubing and pulled them apart after heating the pipe up with a MaPP torch, and after a bit of hack-sawing, zip-sawing, sanding, reheating, and twisting, I had a good pressure release line. "Good," in this case, means sealed up and all running down hill. I read somewhere that you don't want it going uphill at all. :: shrug ::


Once I got everything plugged in and fitted properly, I filled the tank with water and kicked on the gas. It started out with a blue flame, and then the flame went orange as the condensation from inside the water heater built up and dripped down... and then went back to blue.
And... voila. Hot water heater.

